Overview
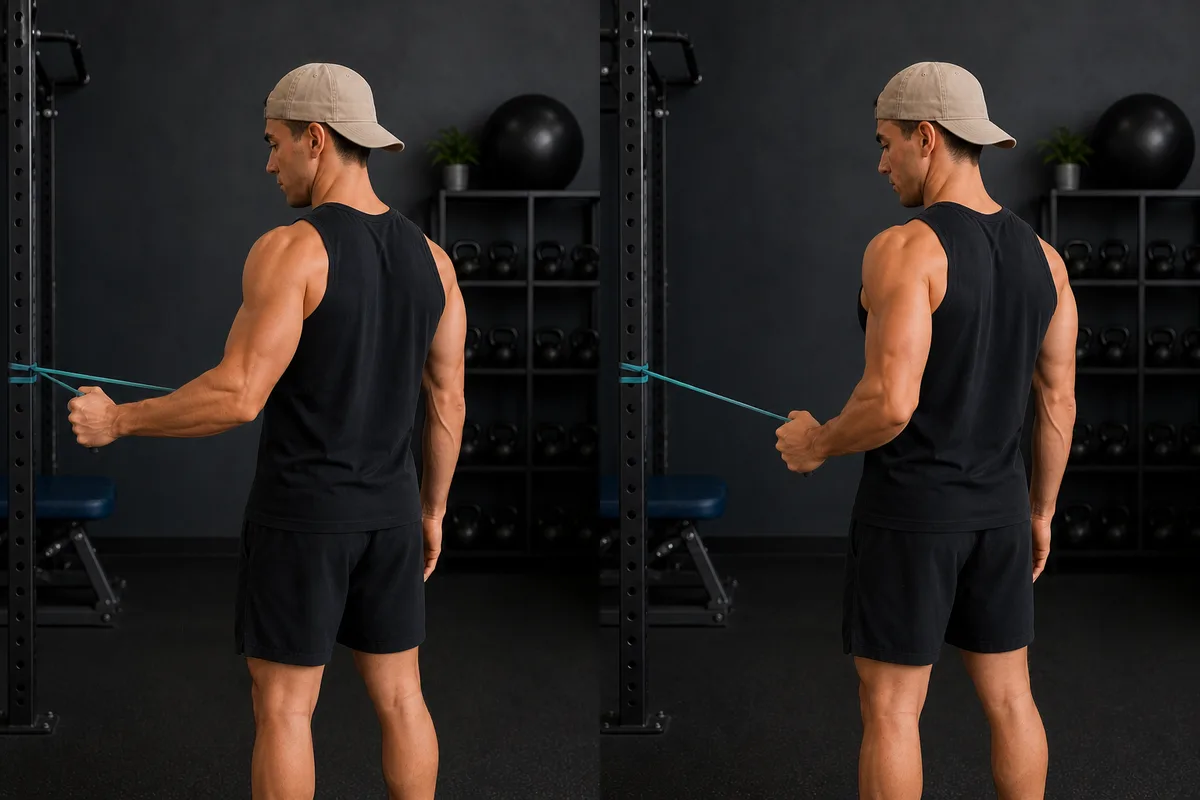
Internal rotation with band trains the muscle on the front of your shoulder blade that rotates your arm inward — the same motion you use to reach across your body or throw a ball. It's the natural partner exercise to external rotation, and together they help balance the strength around your shoulder socket joint.
Exercise Name
Internal Rotation with Resistance Band
Primary Purpose
- Strengthen the muscle responsible for rotating your upper arm bone inward, toward your body
- Build balanced rotator cuff strength alongside external rotation training
- Support the shoulder during activities like throwing, swimming strokes, and pushing movements
Internal rotation strength matters for everyday tasks like reaching across your body, and for sports like throwing and swimming where the arm rotates inward forcefully. Because this muscle is often already strong in people who do a lot of pushing or bench-pressing, this exercise is most valuable as part of a balanced program rather than on its own.
Target Muscles
- Subscapularis — the main muscle producing internal rotation and the largest of the four rotator cuff muscles
- Rotator Cuff Overview — the group as a whole helps keep the upper arm bone centred during the motion
The subscapularis sits on the front of your shoulder blade, tucked between the shoulder blade and your rib cage. You can't see or easily feel it working, but it plays a big role in keeping your shoulder joint stable during rotation and lifting.
Difficulty Level
Beginner
Equipment Required
- A light to medium resistance band (looped or with handles)
- A stable anchor point (door handle, hook, or band anchor) at roughly elbow height
Who Should Perform This
- People recovering from a rotator cuff tear or rotator cuff tendinitis, once cleared for active strengthening
- Throwing and swimming athletes building balanced shoulder strength
- Anyone doing a rotator cuff strengthening program who is already performing external rotation exercises
- People rebuilding shoulder strength after a period of immobilization (for example, in a sling)
Who Should Avoid This
- Anyone in the first few days to weeks after a shoulder dislocation, until cleared for active strengthening
- People with an unhealed fracture around the shoulder or upper arm
- Anyone recovering from a subscapularis tendon repair — this exercise is typically restricted for several weeks after this specific surgery, so follow your surgeon's protocol closely
- People experiencing sharp or worsening pain during the motion
Step-by-Step Instructions
- Anchor the band at roughly elbow height and stand sideways to the anchor point, holding the band in the hand closest to it.
- Tuck your elbow against your side and bend it to 90 degrees, keeping your forearm pointing outward, away from your stomach — this is your starting position.
- Keeping your elbow glued to your side, rotate your forearm inward, across your stomach, until it stops comfortably.
- Pause briefly at the end of the movement, feeling the front of your shoulder and chest area work.
- Slowly return to the starting position, controlling the band's pull the entire way back.
- Repeat for 10–15 repetitions, 2–3 sets, most days of the week or as directed by your physiotherapist.
Common Mistakes
- Letting the elbow swing away from the body — this turns the movement into a chest or shoulder press instead of an isolated rotation. Keep the elbow anchored at your side.
- Twisting the torso to help pull the band — the rotation should happen only at the shoulder, not by turning your hips or spine.
- Using too much resistance — this often causes the shoulder to shrug or the elbow to lift away from the body.
- Snapping back to the start — control the band on the way back just as carefully as on the way across.
Progressions
- Increase resistance band strength as the exercise becomes easy
- Combine with external rotation exercises in the same session for balanced rotator cuff training
- Progress to internal rotation at 90 degrees of shoulder abduction (arm out to the side) for more sport-specific strength, once basic strength is solid
- Add a slow 3-second lowering phase (eccentric control) to build more strength
Easier Alternatives
- Perform the same motion lying on your side with a light dumbbell if you find the band harder to control
- Reduce the range of motion if full rotation causes discomfort
- Start with just the movement pattern using no resistance, focusing on keeping the elbow still
Related Injuries
- Rotator Cuff Tear — helps rebuild strength when the subscapularis or nearby structures are involved
- Rotator Cuff Tendinitis — controlled strengthening builds the tendon's tolerance to load
- Shoulder Dislocation — used later in rehab to restore balanced rotational strength around the joint
Related Anatomy
- Subscapularis — the prime mover in this exercise
- Rotator Cuff Overview — the muscle group this exercise helps balance
- Glenohumeral Joint — the joint being stabilized
References
- Physiopedia. "Rotator Cuff Strengthening Exercises." https://www.physio-pedia.com/Rotator_Cuff_Strengthening_Exercises
- StatPearls (NCBI Bookshelf). "Anatomy, Rotator Cuff." https://www.ncbi.nlm.nih.gov/books/NBK441844/
- OrthoInfo — American Academy of Orthopaedic Surgeons. "Rotator Cuff and Shoulder Conditioning Program." https://orthoinfo.aaos.org/en/recovery/rotator-cuff-and-shoulder-conditioning-program/
- OrthoInfo — American Academy of Orthopaedic Surgeons. "Shoulder Dislocation." https://orthoinfo.aaos.org/en/diseases--conditions/shoulder-dislocation/
This information is for education only and is not a medical diagnosis. InjuryAtlas does not replace an assessment by a qualified health professional. If you have severe pain, visible deformity, numbness, loss of function, or symptoms that are getting worse, seek medical care promptly.