If your shoulder is sore or weak, it is tempting to throw a heavy band at it and hope for the best. Rotator-cuff training works better when it is controlled, comfortable and gradually progressed. These smaller muscles do not need a max-effort test; they need consistent practice with resistance you can actually control.
Before you begin: Get assessed before exercising if your pain began after a fall or sudden injury, you cannot raise your arm normally, you have significant weakness, or your symptoms are rapidly worsening.
What is the rotator cuff?
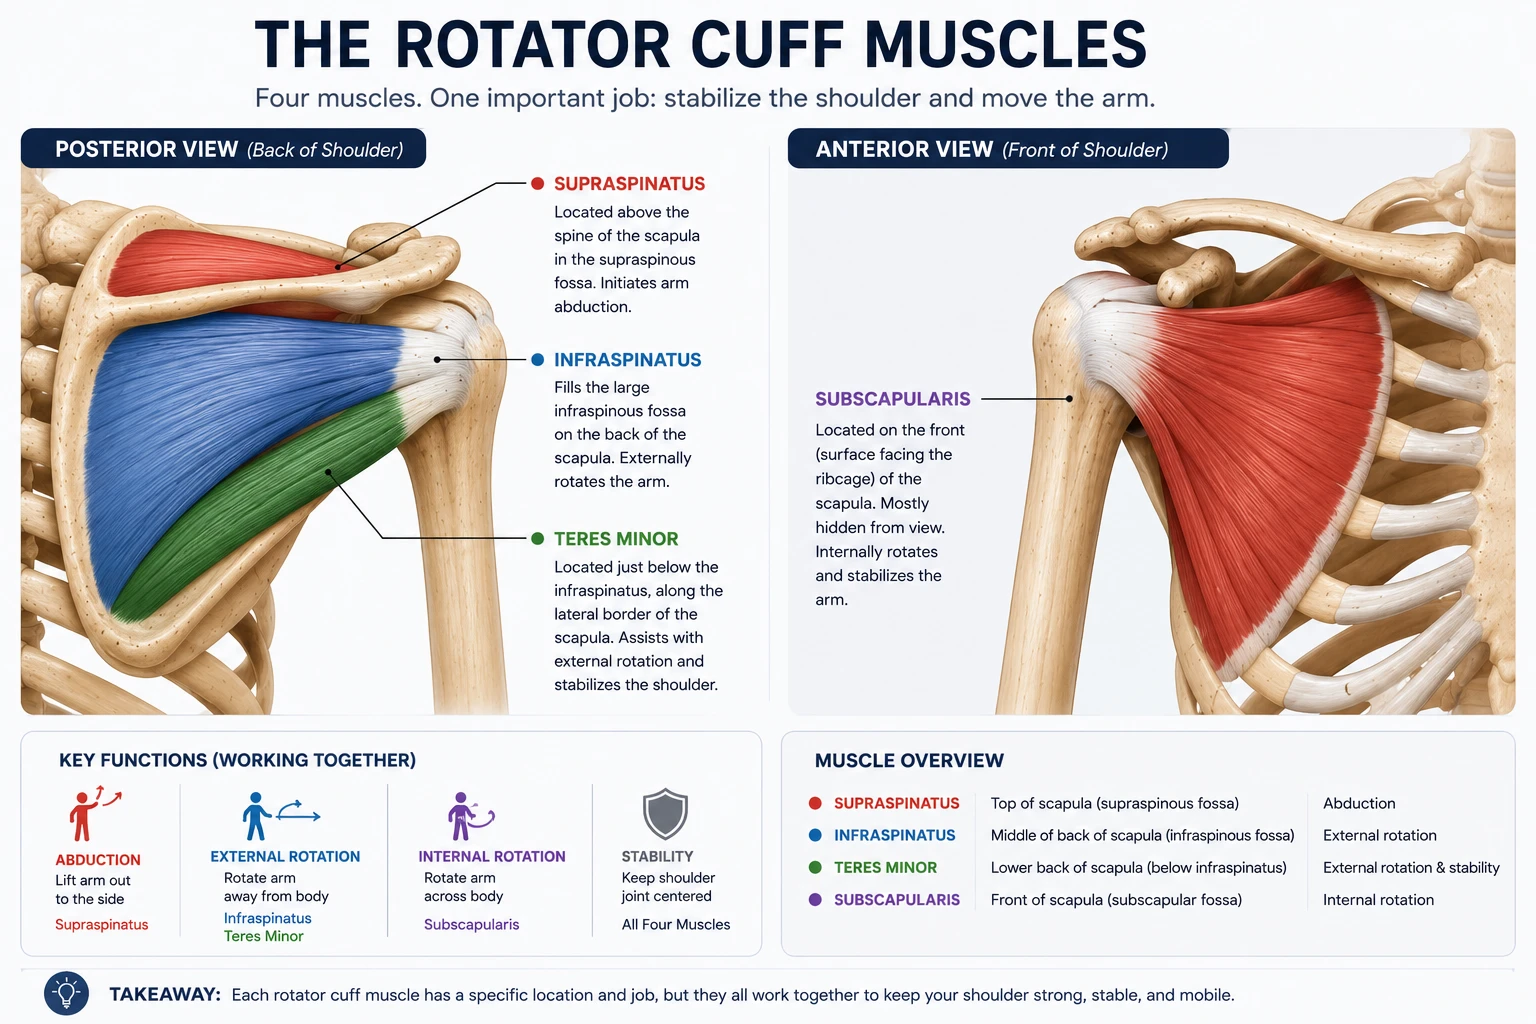
The rotator cuff is made up of four muscles and their tendons: the supraspinatus, infraspinatus, teres minor, and subscapularis. Together, they help keep the head of the upper-arm bone centred in the shoulder socket while you lift and rotate your arm.
The rotator cuff does not work alone. Your shoulder-blade muscles, deltoid, upper back, and trunk all contribute to healthy shoulder movement. That is why a good shoulder program usually includes both rotator-cuff exercises and broader shoulder-blade strengthening.
The five exercises
These exercises move from basic control work to more demanding strengthening. You do not need to perform all five in one session. Start with the movements you can do comfortably and with good control.
1. Isometric shoulder holds
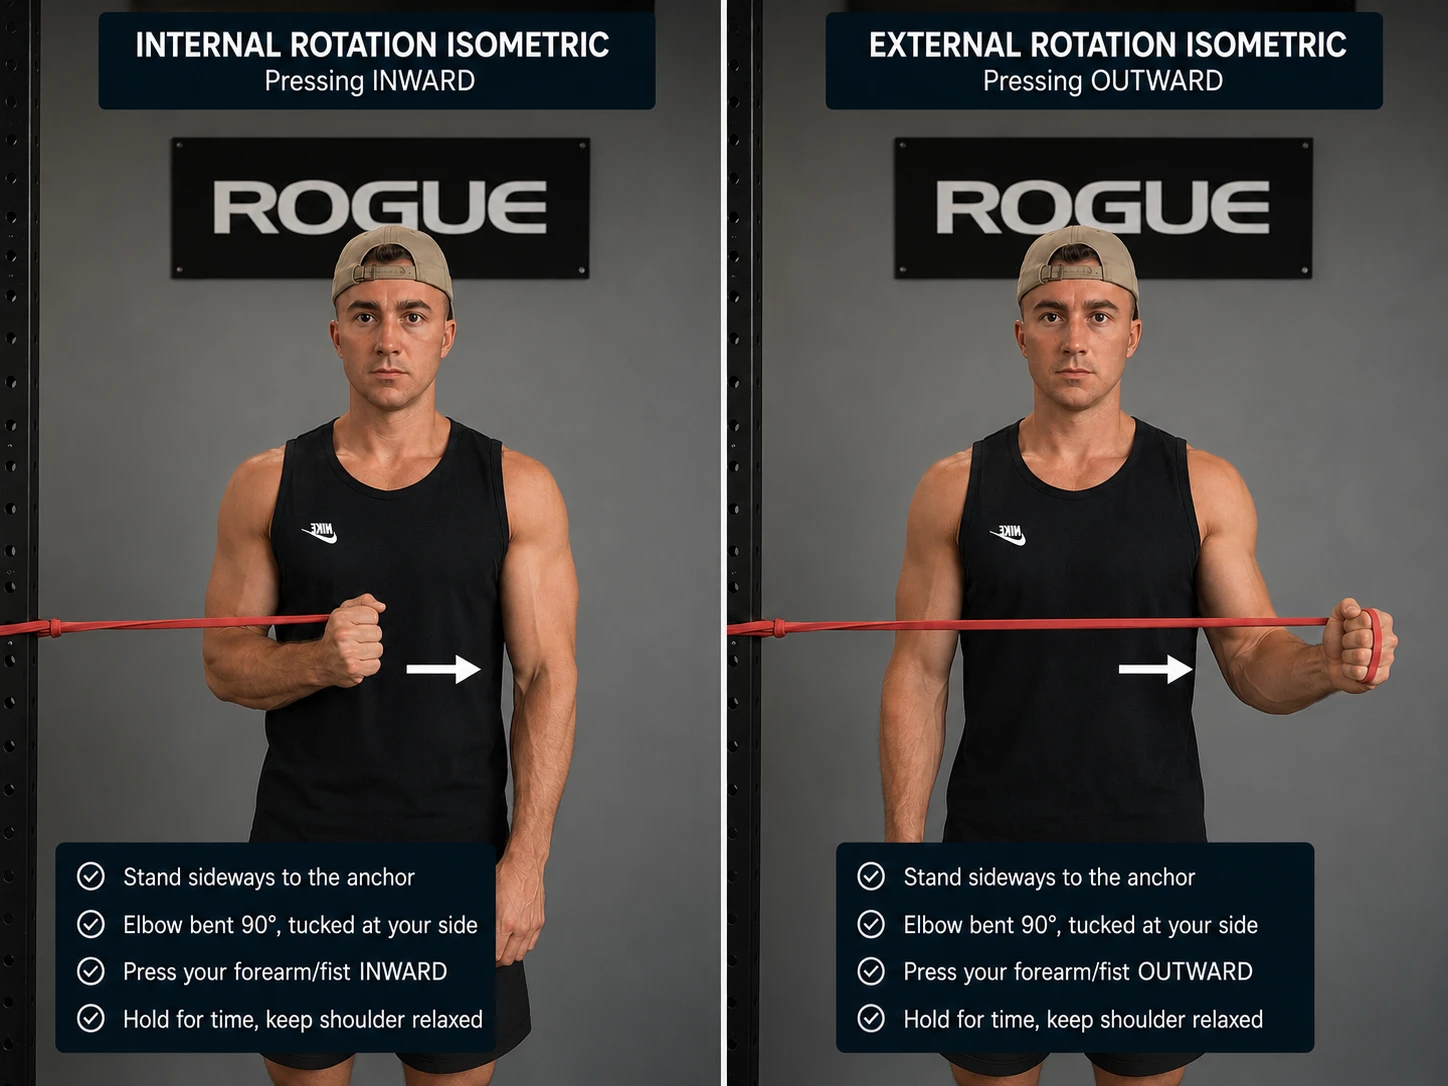
Isometric exercises create muscle tension without visibly moving the joint. They can be a useful starting point when full shoulder movement is uncomfortable or when you are relearning how to activate the rotator cuff.
How to do it
- Stand with your elbow bent to 90 degrees and held close to your side.
- For external rotation, press the back of your hand outward into a wall or anchored band.
- For internal rotation, face the other direction and press inward.
- Keep the elbow still.
- Hold for 10–20 seconds, then relax.
You should feel a gentle contraction around the front or back of the shoulder, not a sharp pinch inside the joint.
Start with: 3–5 holds of 10–20 seconds at a light-to-moderate effort.
Common mistake: Pressing as hard as possible. The goal is controlled activation, not a maximum-strength test.
2. External rotation with a resistance band
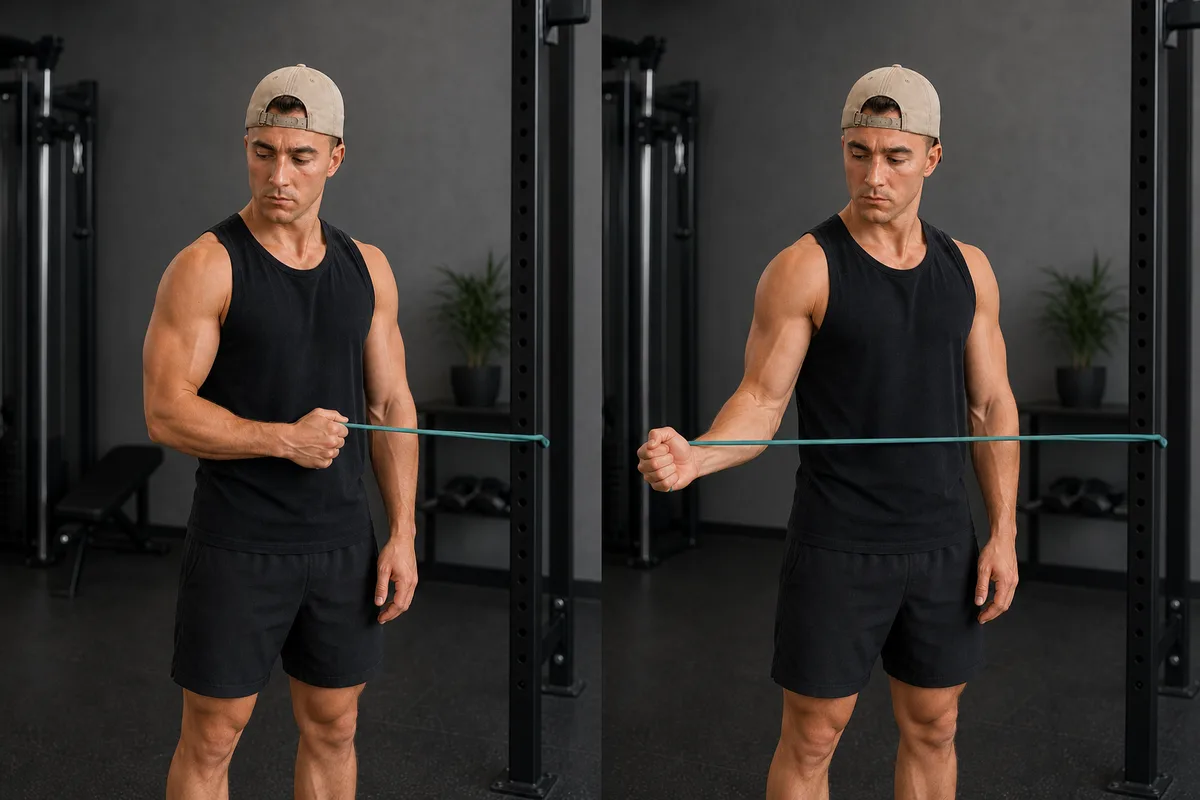
External rotation primarily trains the infraspinatus and teres minor. These muscles rotate the arm outward and help stabilize the shoulder.
How to do it
- Attach a light band at elbow height.
- Stand sideways to the anchor and hold the band with the hand farthest from it.
- Bend your elbow to 90 degrees and keep it close to your side.
- Slowly rotate your forearm away from your body.
- Pause, then return with control.
A small folded towel between your elbow and ribs can help you keep the arm in a comfortable position. You should feel the back of the shoulder working without having to twist your torso or shrug.
Start with: 2–3 sets of 10–15 controlled repetitions using a very light band.
Common mistake: Using so much resistance that your torso rotates or your elbow drifts away from your side.
3. Internal rotation with a resistance band
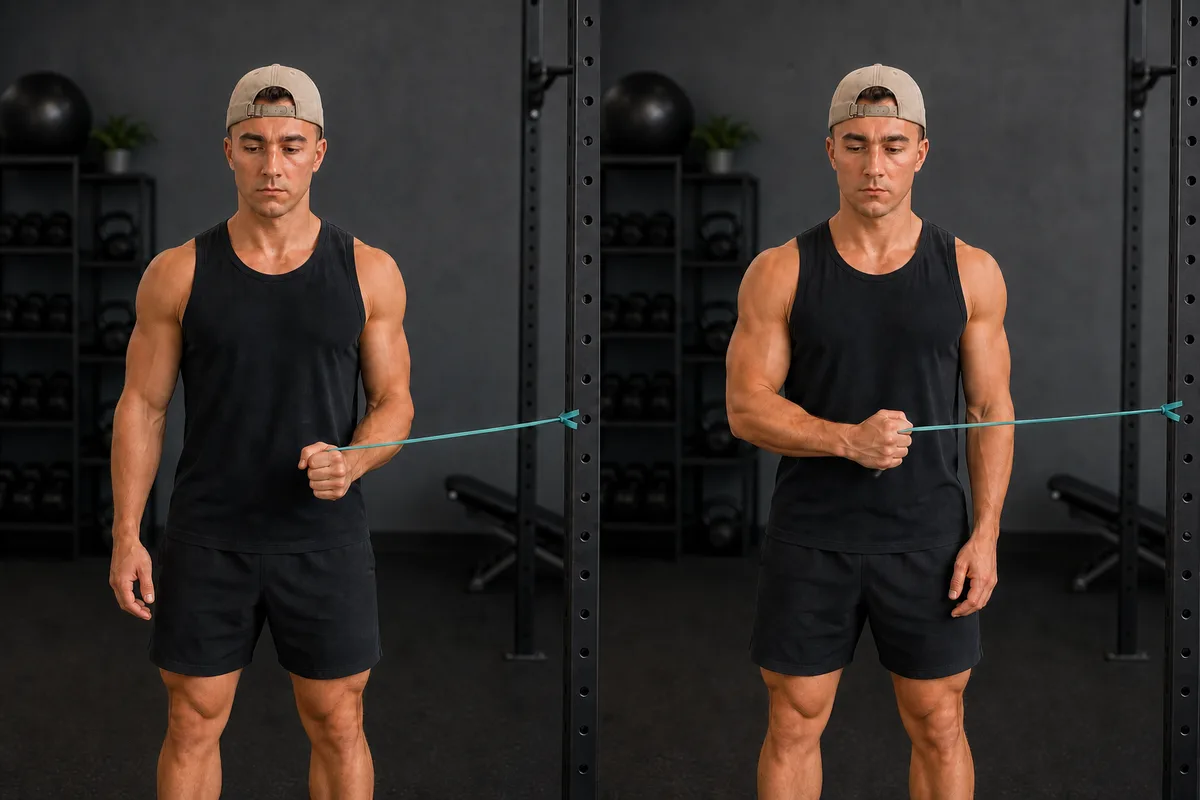
Internal rotation trains the subscapularis, the largest rotator-cuff muscle.
How to do it
- Attach the band at elbow height.
- Stand with the working arm closest to the anchor.
- Keep your elbow bent to 90 degrees and tucked comfortably against your side.
- Pull the band inward across the front of your body.
- Pause, then return slowly.
You should feel controlled work at the front of the shoulder. The movement should come from the shoulder, not from turning your torso.
Start with: 2–3 sets of 10–15 repetitions using light resistance.
Common mistake: Letting the shoulder roll forward or using your chest and torso to pull the band.
4. Full-can raise
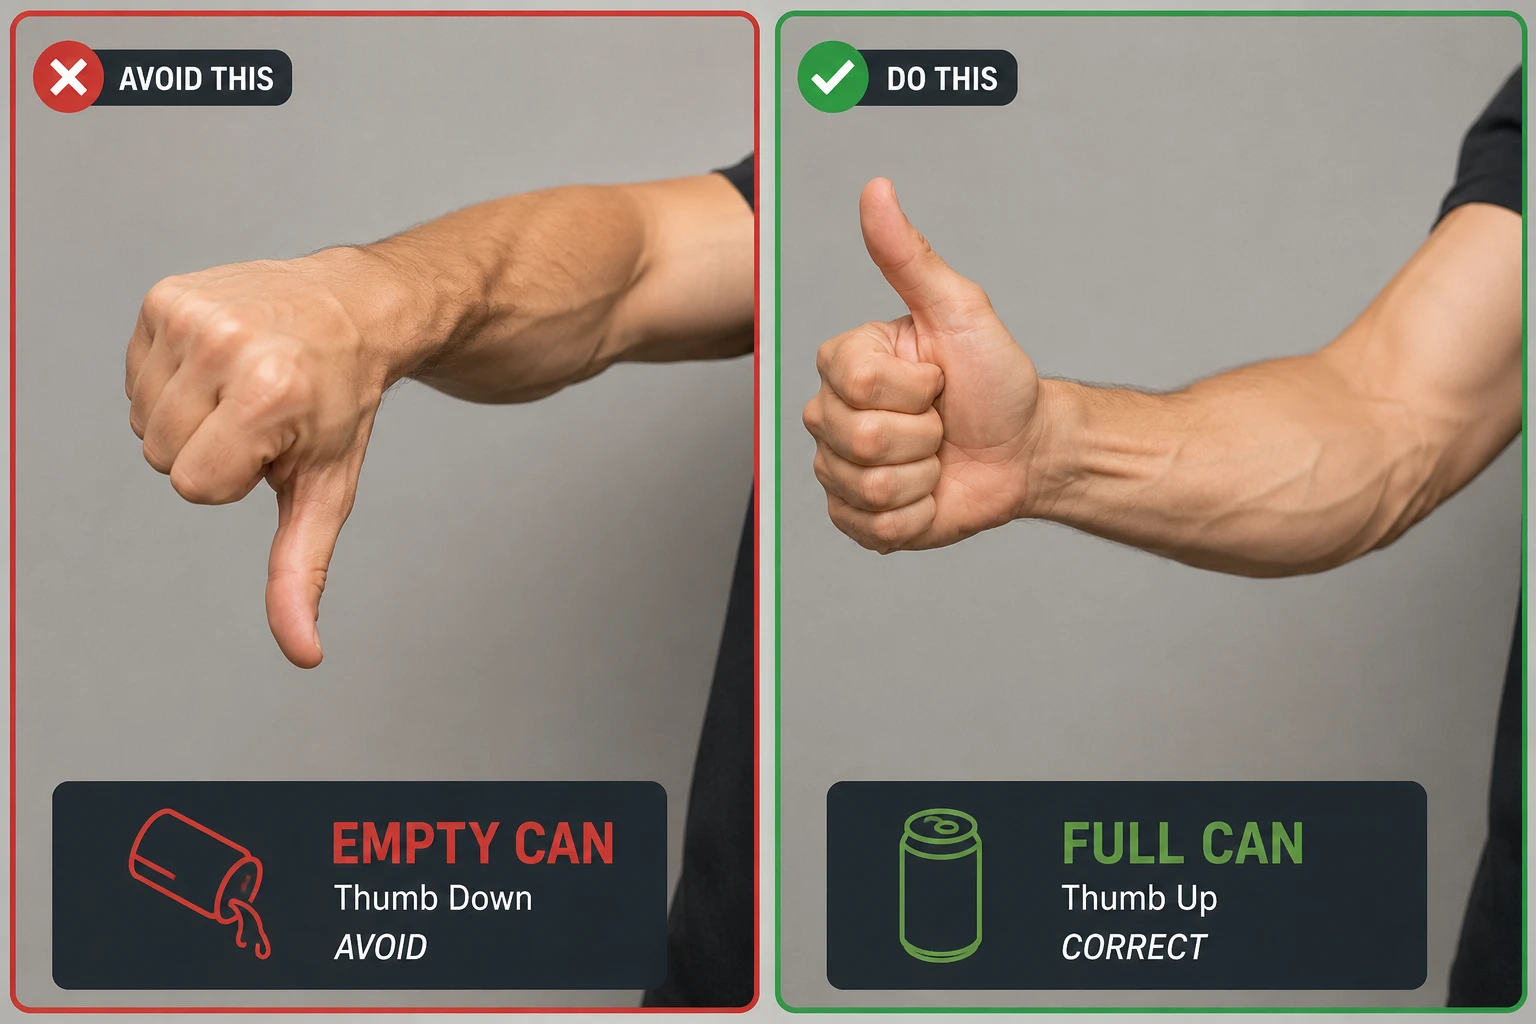
The full-can raise trains the shoulder in a position many people find more comfortable than the traditional empty-can position. Raise your arms slightly forward in the plane of the shoulder blade with your thumbs pointing up.
How to do it
- Stand tall with your arms at your sides and thumbs pointing up.
- Raise your arms slightly forward and outward, forming a wide V.
- Stop at shoulder height, or earlier if that is your comfortable range.
- Lower slowly.
Start with no weight or very light dumbbells. You should feel the shoulder and upper arm working without a sharp pinch at the top or front of the joint.
Start with: 2–3 sets of 8–12 repetitions.
Common mistake: Turning the thumbs down. That position is not automatically harmful, but it may be less comfortable for an already sensitive shoulder.
5. Prone Y-T raise
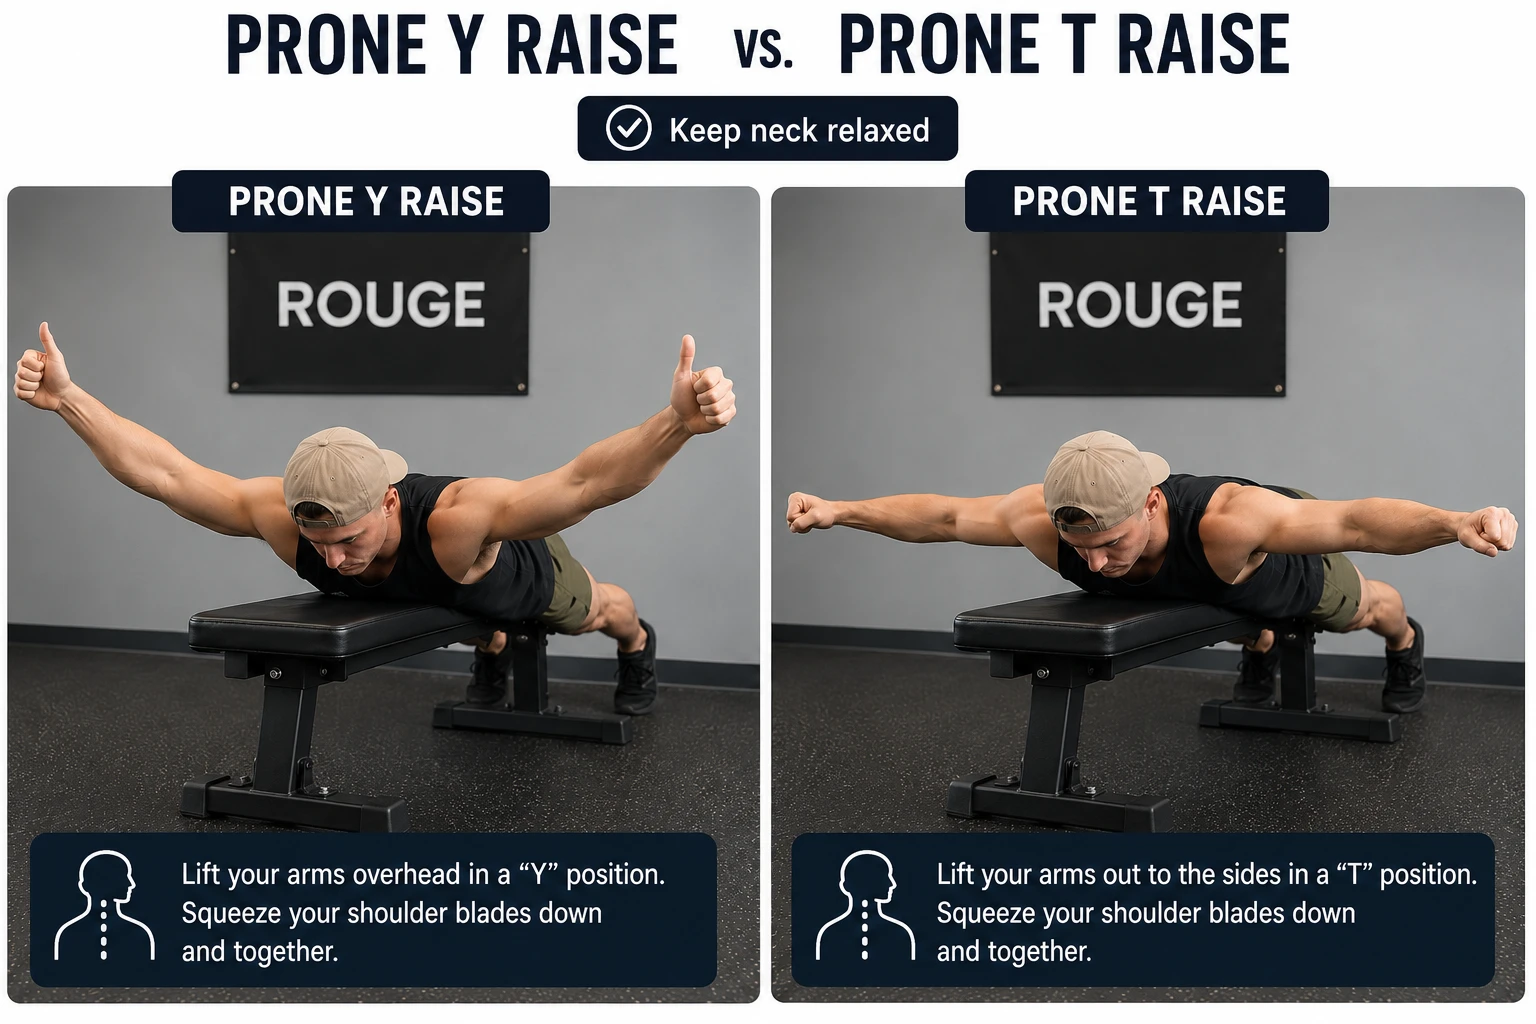
Prone Y and T raises train muscles that control the shoulder blades and support overhead movement. They are not isolated rotator-cuff exercises, but they strengthen the system the cuff relies on.
Lie face down on a bench, bed, or exercise ball.
Y raise
- Extend your arms overhead at an angle to form a Y.
- Keep your thumbs pointing up.
- Lift your arms gently without shrugging.
- Lower slowly.
T raise
- Extend your arms out to the sides to form a T.
- Keep your thumbs pointing up or forward.
- Lift your arms slightly while gently drawing the shoulder blades together.
- Lower with control.
You should feel work between and below the shoulder blades while your neck stays relaxed.
Start with: 2 sets of 8–12 repetitions with no weight. Add very light weights only when the movement feels easy.
Common mistake: Trying to lift as high as possible. A small, controlled movement is usually better than a large movement driven by shrugging or arching your back.
Three mistakes that can make shoulder pain worse
1. Training through sharp or increasing pain
Mild effort and muscle fatigue are expected. Sharp pain, catching, or pain that steadily increases through a set is a reason to stop and reassess.
- Mild discomfort that settles quickly may be acceptable.
- Sharp, catching, or escalating pain means stop.
- Pain that remains noticeably worse the next day may mean the resistance, range, or volume needs to change.
2. Using too much resistance
Heavy resistance often causes the deltoid, chest, upper trapezius, or torso to take over. The band is probably too heavy if your elbow drifts, your shoulder shrugs, your torso twists, or you cannot control the return.
Choose a resistance that lets you complete slow, clean repetitions.
3. Progressing too quickly
Increasing the resistance, repetitions, range, and frequency at the same time makes it difficult to know what caused a flare-up.
Progress in this order:
- Improve movement quality.
- Add repetitions.
- Add another set.
- Increase resistance slightly.
- Move to a more demanding position.
A simple starting routine
- Isometric external rotation: 3 holds of 15 seconds
- Band external rotation: 2 sets of 12
- Band internal rotation: 2 sets of 12
- Full-can raise: 2 sets of 8–10
- Prone Y or T raise: 2 sets of 8–10
For general strengthening, two or three sessions per week is a reasonable starting point for many people. Allow recovery between harder sessions.
When to progress
Progress when you can complete every repetition with no sharp pain, shrugging, torso twisting, or loss of control, and without meaningful worsening later that day or the next morning. Change only one variable at a time.
When to get assessed
Arrange an assessment if the pain followed a fall or sudden injury, you felt a pop followed by weakness, you cannot lift the arm normally, weakness is worsening, pain regularly wakes you, symptoms travel down the arm, or several weeks of sensible exercise have not helped.
Frequently asked questions
Can I train the rotator cuff every day?
Gentle isometric or low-effort control exercises may be tolerated daily. More demanding resistance work usually needs recovery time.
Should these exercises hurt?
They may produce mild muscular effort or fatigue, but they should not cause sharp, catching, or steadily increasing pain.
How heavy should the band or weight be?
Usually lighter than people expect. You should be able to move slowly without shrugging, twisting, or losing control.
Are these exercises enough for every shoulder problem?
No. Shoulder pain can involve several structures, including the rotator cuff, bursa, joint, labrum, biceps tendon, or neck. The right program depends on the cause and stage of recovery.
Key takeaways
- Use light resistance and controlled movement.
- Start in comfortable positions and progress gradually.
- Do not force range of motion.
- Keep your neck relaxed and avoid shrugging.
- Sudden weakness, loss of motion, or pain after an injury should be assessed.
See it in 3D
Seeing exactly where the supraspinatus, infraspinatus, teres minor, and subscapularis sit, and how little room the tendons have under the acromion, makes it a lot clearer why hand position and arm angle matter so much in these exercises.
Explore the Right Shoulder in the 3D Anatomy Explorer →
Continue learning
- Rotator Cuff Tear vs. Shoulder Impingement
- Rotator Cuff Tear: Full Guide
- Rotator Cuff Tear Rehab Guide
- Preventing Rotator Cuff Injuries
- Rotator Cuff Overview (Anatomy)
Educational information only
This article does not diagnose an injury or replace care from a qualified healthcare professional.
Sources: AAFP Rotator Cuff Exercises, Timmons et al., "Empty can exercise provokes more pain and has undesirable biomechanics compared with the full can exercise," Journal of Shoulder and Elbow Surgery, 2016, OrthoInfo Rotator Cuff and Shoulder Conditioning Program.