Overview
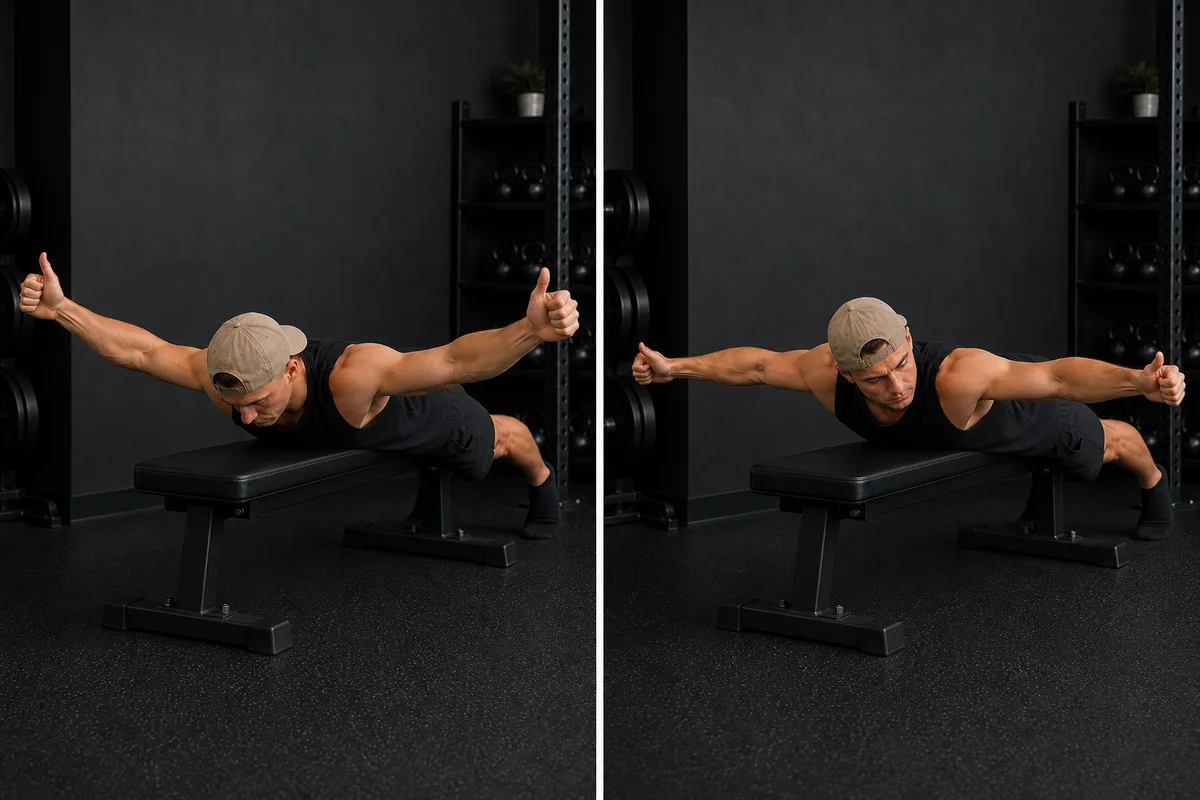
The prone Y-T raise is performed lying face-down while lifting your arms into a "Y" shape and then a "T" shape. It's a favourite in shoulder rehab and sports performance programs because it strengthens the muscles that stabilize your shoulder blade during almost every overhead and pulling movement you do.
Exercise Name
Prone Y-T Raise
Primary Purpose
- Strengthen the lower trapezius and shoulder blade stabilizers that are commonly weak in people with rounded, forward shoulders
- Improve control of the shoulder blade during overhead reaching, which supports healthy rotator cuff mechanics
- Build endurance in the postural muscles of the upper back
Raising your arms into a "Y" shape targets slightly different muscle fibers than raising them into a "T" shape, which is why this exercise combines both positions — together they cover a broader range of the shoulder blade stabilizers than either position alone.
Target Muscles
- Trapezius — particularly the lower fibers during the "Y" position and the middle fibers during the "T" position
- Deltoid — the rear fibers assist in lifting the arms in both positions
- Rotator Cuff Overview — helps stabilize the shoulder joint as the arms lift against gravity
Difficulty Level
Intermediate
Equipment Required
- A mat or exercise bench
- Optional: light dumbbells (0.5–2 kg / 1–4 lb) once bodyweight feels easy
Who Should Perform This
- People with shoulder impingement syndrome who need stronger shoulder blade stabilizers
- Desk workers and anyone with rounded, forward-shoulder posture
- Overhead athletes and swimmers building comprehensive upper back and shoulder strength
- Anyone in the later stages of shoulder rehab working toward more functional, multi-directional strength
Who Should Avoid This
- Anyone with an unhealed fracture around the shoulder, collarbone, or upper spine
- People with acute, unresolved shoulder pain that has not been assessed, especially with sharp pain on lifting the arms
- Anyone in early recovery after shoulder or spine surgery without their surgeon's clearance for this position and movement
- People with significant lower back pain that is aggravated by lying face-down — modify position or avoid until resolved
Step-by-Step Instructions
- Lie face-down on a mat or bench with your forehead resting on a small folded towel for neck comfort.
- Let your arms hang relaxed toward the floor to start.
- For the "Y" position: raise your arms out at roughly a 45-degree angle from your body, thumbs pointing up, forming a "Y" shape with your body. Lift only as high as you can without your lower back arching.
- Pause briefly at the top, squeezing your shoulder blades down and together, then lower with control.
- For the "T" position: raise your arms straight out to the sides, thumbs pointing up, forming a "T" shape with your body.
- Pause briefly at the top, then lower with control.
- Perform 8–12 repetitions of each position (Y, then T), for 2–3 sets, 3 times per week.
Common Mistakes
- Arching the lower back to lift the arms higher — this means you're using momentum and back extension rather than shoulder blade strength. Keep your core gently braced and only lift as high as good form allows.
- Shrugging the shoulders toward the ears — focus on drawing the shoulder blades down and together rather than hiking them upward.
- Using too much weight too soon — this exercise is often effective with just the weight of your arms; add resistance gradually.
- Rushing through repetitions — a slow, controlled tempo works the stabilizing muscles far more effectively than fast, jerky lifts.
Progressions
- Add light dumbbells once bodyweight repetitions feel easy with good form
- Increase the pause time at the top of each position (2–3 seconds)
- Add the "W" position (elbows bent, pulling back like a row) to create a full "Y-T-W" combination exercise
- Progress to standing or bent-over versions with resistance bands for a more functional challenge
Easier Alternatives
- Reduce the range of motion, lifting only slightly off the floor at first
- Perform one arm at a time instead of both together, which reduces the load on your lower back
- Try the movement standing and bent forward at the hips instead of lying face-down, if lying prone is uncomfortable
Related Injuries
- Shoulder Impingement Syndrome — stronger shoulder blade stabilizers reduce crowding during overhead motion
- Rotator Cuff Tendinitis — improved shoulder blade control reduces ongoing strain on rotator cuff tendons
Related Anatomy
- Trapezius — the primary muscle strengthened by this exercise
- Scapula (Shoulder Blade) — the bone being stabilized throughout the motion
- Deltoid — assists with lifting the arms
- Rotator Cuff Overview — supports joint stability during the lift
References
- Physiopedia. "Rotator Cuff Strengthening Exercises." https://www.physio-pedia.com/Rotator_Cuff_Strengthening_Exercises
- Journal of Orthopaedic & Sports Physical Therapy (JOSPT). "An Update of Systematic Reviews Examining the Effectiveness of Conservative Physical Therapy Interventions for Subacromial Shoulder Pain." https://www.jospt.org/doi/10.2519/jospt.2020.8498
- OrthoInfo — American Academy of Orthopaedic Surgeons. "Rotator Cuff and Shoulder Conditioning Program." https://orthoinfo.aaos.org/en/recovery/rotator-cuff-and-shoulder-conditioning-program/
This information is for education only and is not a medical diagnosis. InjuryAtlas does not replace an assessment by a qualified health professional. If you have severe pain, visible deformity, numbness, loss of function, or symptoms that are getting worse, seek medical care promptly.